Hello…
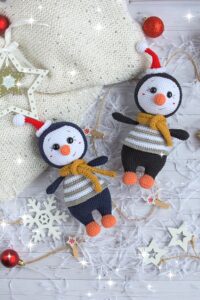
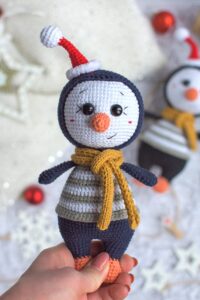
One of the free amigurumi crochet patterns we will share today is the amigurumi penguin, whose photos and design belong to Tanya Kostochenkova. You can learn how to crochet these penguin using the free amigurumi pattern. Thanks to Tanya Kostochenkova for this cute penguin.

If you don’t know how to often crochet and needles, read our shares. Start your knitting according to the rate you have according to the shape you will make. Shape your toy by increasing and decreasing the point. Once you weave the shape you want to fill the inside of your toy and look at the pictures to decorate.
Amigurumi cats, amigurumi dolls, amigurumi dogs, amigurumi unicorns, amigurumi lambs, amigurumi dinosaurs, amigurumi foxes, amigurumi bears, amigurumi giraffes, amigurumi pigs, amigurumi penguins, amigurumi panda, amigurumi llama, amigurumi bunny, amigurumi clowns, amigurumi elephants, amigurumi hippos, amigurumi monkeys will not be difficult for you…
Materials
1. Yarn Yarn Art Jeans № 53 (black) or Alize Cotton Gold №58 (dark blue), №23 (orange), №84 (mustard), Alize Cotton Gold №21 (gray), №55 (white), №56 (red), Alize Softy №55 (white)
2. The hook Clover №2
3. Stuffing (hollofayber)
4. Knitting needles №2,25
5. Black halfbeads 12 mm in diameter for the eyes or the eyes with stalks the same diameter
6. A moment glue or glue gun for halfbreads
7. A black sewing thread for the decoration of the muzzle
8. A thick needle for sewing of the details
9. Scissors
When using the recommended materials, the height of the toy will be 17.5 cm without a cap, 22 cm with a cap.
Abbreviations
mc – magic circle
ch – chain
sl st – slip stitch
sc – single crochet
hdc – half double crochet
dc – double crochet
tr – treble crochet
inc – increase (crochet two sc in 1 stitch)
dec – decrease (crochet two sc together)
bk lp – back loop
fr lp – front loop
(…) – the number in brackets means the number of loop in a row
Crochet in a spiral without sl st in the end of a row, don’t return the crocheting unless indicated.
AMIGURUMI LITTLE PENGUIN CROCHET FREE PATTERN
Legs
Crochet the foot with the orange yarn. Make chain 6 ch and start to crochet from the second loop from the hook.
1 rnd: 4 sc, 3 sc in the last loop of the chain, crochet on another side of the chain 3 sc, inc (12)
2 rnd: inc, 3 sc, 3 inc, 3 sc, 2 inc (18)
3-5 rnd: 18 sc
6 rnd: 2 sc, dec, (4 sc, dec)*2, 2 sc (15)
7 rnd: 15 sc
8 rnd: 1 sc, 5 ch (skip 5 loop and insert the hook in the 7th loop of the row), 9 sc (15)
9 rnd: (3 sc, dec)*3 (12)
10 rnd: 6 dec (6)
Stuff the detail, tighten the opening, hide the end of the thread inside the detail.
Attach the black or dark blue yarn to the loop between the heel and the foot (look at the photo) and crochet according to the scheme:
11 rnd: 12 sc
12 rnd: (3 sc, inc)*3 (15)
13 rnd: 15 sc
14 rnd: 2 sc, inc, (4 sc, inc)*2, 2 sc (18)
15 rnd: 18 sc
Crochet 1 additional sc, cut the yarn, stuff the detail.
Make the second leg the same way. Crochet 11 additional sc after the 15th row, cut the yarn, stuff the detail.
Wings
Crochet 2 details with the black or dark blue yarn, don’t stuff.
1 rnd: 6 sc in mc
2 rnd: 6 inc (12)
3 rnd: (1 sc, inc)*6 (18)
4-6 rnd: 18 sc
7 rnd: (7 sc, dec)*2 (16)
8 rnd: 16 sc
9 rnd: 3 sc, dec, 6 sc, dec, 3 sc (14)
10 rnd: 14 sc
11 rnd: (5 sc, dec)*2 (12)
12 rnd: 2 sc, dec, 4 sc, dec, 2 sc (10)
13 rnd: (3 sc, dec)*2 (8)
Crochet 1 additional sc, fold the detail in half and connect the edges by 4 sc. Cut the yarn, fasten off, hide the end of the thread inside the detail.
Body
Crochet chain 3 ch from the 2nd leg and insert the hook in the loop of the first leg from the outside as it is shown at the photo. Stuff tightly in the course of crocheting.
16 rnd: 18 sc on the first leg, 3 sc on the first side of the chain, 18 sc on the second leg, 3 sc on the other side of the chain (42)
17 rnd: 3 sc, inc, (6 sc, inc)*5, 3 sc (48)
18 rnd: (7 sc, inc)*6 (54)
19 rnd: 4 sc, inc, (8 sc, inc)*5, 4 sc (60)
20-26 rnd: 60 sc
Crochet 30 additional sc, after that change the yarn to the gray.
27 rnd: 60 sc Change the yarn to the white
28 rnd: 60 sc for the bk lp
29 rnd: 60 sc Change the yarn to the gray
30 rnd: 60 sc
31 rnd: 4 sc, dec, (8 sc, dec)*5, 4 sc (54) Change the yarn to the white
32 rnd: 54 sc
33 rnd: (7 sc, dec)*6 (48) Change the yarn to the gray
34 rnd: 48 sc
35 rnd: 3 sc, dec, (6 sc, dec)*5, 3 sc (42) Change the yarn to the white
36 rnd: 42 sc
37 rnd: (5 sc, dec)*6 (36) Change the yarn to the gray
38 rnd: 36 sc
39 rnd: 2 sc, dec, (4 sc, dec)*5, 2 sc (30) Change the yarn to the white
40 rnd: 6 sc, attach the first wing, crochet 4 sc grasping 4 loops of the wing and 4 loops of the body together (look at the photo), 11 sc, attach the second wing, crochet 4 sc grasping 4 loops of the wing and 4 loops of the body together, 5 sc (30)
41 rnd: (3 sc, dec)*6 (24) Change the yarn to the black or dark blue
42 rnd: 24 sc for the bk lp
43 rnd: 24 sc Cut the yarn, leaving a long end enough for sewing.
Turn the body upside down, attach the gray yarn to the last front loop of the 27th rnd and crochet according to the scheme:
1-2 rnd: 1 ch, 60 sc, sl st to join in the end
3 rnd: 60 sl st
Cut the yarn, fasten off, hide the end of the thread inside the detail.
Now crochet the collar. To do this attach the gray yarn to the first front loop of the 41st row and
crochet according to the scheme:
1 rnd: 1 ch, 24 sc, sl st to join in the end
Cut the yarn, fasten off, hide the end of the thread inside the detail.
Tail
Crochet the tail with the black or dark blue yarn according to the scheme:
1 rnd: 6 sc in mc
2 rnd: (1 sc, inc)*3 (9)
3 rnd: 1 sc, inc, (2 sc, inc)*2, 1 sc (12)
4 rnd: 12 sc
Fold the detail in half and connect the edges by
6 sc. Cut the yarn, leaving a long end enough for sewing. Don’t stuff!
Sew the tail to the body at the level of the 26th row in the center.
Head
The head of our penguin consists of the two details.
Start with detail №1, crochet it with the white yarn, stuff tightly in the course of crocheting.
1 rnd: 6 sc in mc
2 rnd: 6 inc (12)
3 rnd: (1 sc, inc)*6 (18)
4 rnd: 1 sc, inc, (2 sc, inc)*5, 1 sc (24)
5 rnd: (3 sc, inc)*6 (30)
6 rnd: 2 sc, inc, (4 sc, inc)*5, 2 sc (36)
7 rnd: (5 sc, inc)*6 (42)
8 rnd: 3 sc, inc, (6 sc, inc)*5, 3 sc (48)
9 rnd: (7 sc, inc)*6 (54)
10 rnd: 4 sc, inc, (8 sc, inc)*5, 4 sc (60)
11 rnd: (9 sc, inc)*6 (66)
12-22 rnd: 66 sc
If you want to insert the eyes with stalks, it’s time to insert them. I recommend to insert them between the 16 and 17 rows, the space between the stalks is 8 sc.
23 rnd: (9 sc, dec)*6 (60)
24 rnd: 4 sc, dec, (8 sc, dec)*5, 4 sc (54)
25 rnd: (7 sc, dec)*6 (48)
26 rnd: 3 sc, dec, (6 sc, dec)*5, 3 sc (42)
27 rnd: (5 sc, dec)*6 (36)
28 rnd: 2 sc, dec, (4 sc, dec)*5, 2 sc (30)
29 rnd: (3 sc, dec)*6 (24)
30 rnd: 1 sc, dec, (2 sc, dec)*5, 1 sc (18)
31 rnd: (1 sc, уб)*6 (12)
32 rnd: 6 dec (6)
Tighten the opening, hide the end of the thread inside the detail.
Crochet the detail №2 with the black or dark blue yarn. Repeat rows 1 through 22 similar to detail №1.
23 rnd: 66 sc
24 rnd: (9 sc, dec)*6 (60)
25 rnd: 25 sc, 2 hdc, 2 dc, 2 tr, 2 dc, 2 hdc, 25 sc
Cut the yarn, leaving a long end enough for sewing.
Beak
Crochet with the orange yarn.
1 rnd: 6 sc in mc
2 rnd: 6 inc (12)
3 rnd: (3 sc, inc)*3 (15)
4 rnd: (3 sc, dec)*3 (12)
Cut the yarn, leaving a long end enough for sewing. Stuff the detail.
Muzzle
Make the tightening for the eyes. To do this mark the points 1 and 3 between the 15 and 16 rows and the points 2 and 4 between the 17 and 18 rows in the immediate vicinity of the eyes (if you use eyes with stalks).
Now insert a needle in the head, fasten off a thread and take it out in the point 1, then insert in the head in the point 2 and take out in the point 3, tighten a thread. Again insert a needle in the head in the point 4 and take it out in the point 1, tighten a thread.
Repeat this action 2-3 times, fasten off, cut a thread and hide inside the head.
Those who will glue the eyes need to mark the points at the same level (the points 1 and 3 between the 15 and 16 rows and the points 2 and 4 between the 17 and 18 rows), the space between them is 8 sc. Do the tightening as described above. The next step is gluing the eyes with the help of a glue gun.
Try on the beak to the head with the help of the pins and sew it between 17th and 22nd row of the head as it is shown at the photo.
Then embroider the whites of the eyes with white thread, the eye-lashes, brows and smile with black thread and cheeks with the red thread.
Place the detail №1 inside of the detail №2 so that the protrusion is on top in the center of the head and sew.
Try on the head to the body and start to sew it. In the course of sewing stuff the neck very tight, so as the head does not dangle because of its heaviness.
Cap
Start with the white yarn
1 rnd: 6 sc in mc.
2 rnd: 6 inc (12)
3 rnd: (3 sc, inc)*3 (15)
4-5 rnd: 15 sc
6 rnd: (3 sc, dec)*3 (12)
7 rnd: 6 dec (6)
Stuff the detail, change the yarn to the red
8-12 rnd: 6 sc
13 rnd: (1 sc, inc)*3 (9)
14 rnd: 9 sc
15 rnd: 1 sc, inc, (2 sc, inc)*2, 1 sc (12)
16 rnd: 12 sc
17 rnd: (3 sc, inc)*3 (15)
18 rnd: 15 sc
19 rnd: 2 sc, inc, (4 sc, inc)*2, 2 sc (18)
20 rnd: 18 sc
21 rnd for the fr lp: 1 sc, inc, (2 sc, inc)*5, 1 sc (24)
Change the yarn to the white Softy. Don’t cut the red thread , leaving a long end enough for sewing.
22 rnd: 24 sc
Cut the yarn, fasten off, hide the end of the thread. Sew the cap to the head as it is shown at the photo.
It’s left to knit the scarf. To do this cast on 6 stitches with the mustard yarn and knit stockinette stitch to the desired length (I have a scarf length of 38 cm).
Tie the scarf to the penguin and admire our handsome!
Little penguin is ready!